The slow cooker cooks food automatically thanks to a computer program. It can be fried, baked, stewed, boiled, steamed and deep-fried. This is a fairly reliable device that can last for decades without breakdowns. Multicooker malfunctions are rare, in addition, in many cases, the device can be repaired with your own hands.
Device and principle of operation
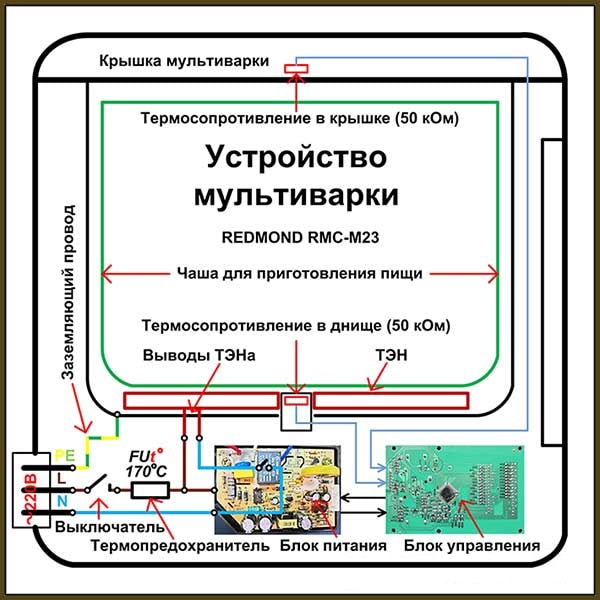
Before you fix a home multicooker, you need to understand its device. The design includes:
- Outer casing (usually plastic or aluminum). All other structural elements are connected to it.
- On top is a lid with a valve for releasing steam. The tightness of the connection is ensured by a rubber rim and a locking mechanism.
- Outside, a control panel is installed. It often has a display. Buttons can be touch or normal.
- The microprocessor is under control. It is he who is responsible for turning on and off the heating element. Its work is regulated by the control panel.
- Inside the case there is an electric heating element, usually one and below, but there may be several. It is mounted in the housing, it can heat up to 40-180 aboutC.
- Directly above it is a metal or ceramic bowl. It has a non-stick coating. A sieve with large holes comes with it - this is a plastic insert for steaming.
- In addition, the design includes a temperature and pressure sensor. It is installed between the bowl and the body, usually at the bottom of the structure.
The principle of operation and the main structural elements:
The bowl stands directly on the heating element, which creates the temperature from the electric current. Multicookers make little noise during operation. In this case, due to the tightness inside, increased pressure is created, which can be regulated using a special valve for steam. Above the bowl is a plastic sieve on which it is permissible to stew meat and vegetables. You can not only select the temperature, but also set its automatic change during cooking.
The most common principle of operation is heating the bowl from an electromagnetic coil. This method has high efficiency, and the design itself is reliable. A more modern heating system is that it is not the heating element that is heating up, but the multicooker bowl itself. This happens under the influence of electromagnetic waves. Because of this, the multicooker bowl looks more massive in order to better retain heat.
Common causes of multicooker breakdowns
It is better to protect the structure from damage, so you should know the common causes of malfunctions. The most rare problem is production defects, but defective products are sometimes found. The most common mistake is putting dishes in a bowl when it is standing in a slow cooker. In this case, there is always the possibility that fat, moisture, or pieces of food will fall into the interior of the case.
Before going to the service center, try to arrange the work yourself:
The root of all ills is non-compliance with the operating rules, so read the instructions for use carefully.
Of course, it is forbidden to hit, drop, use the product for other purposes.Do not put the crock-pot close to a battery or gas stove. This can lead to overheating of the case during operation, as a result of which internal electrical components sometimes deteriorate. Also, the device often does not work due to the connection of the multicooker to the high-voltage network.
Multicooker Software Errors
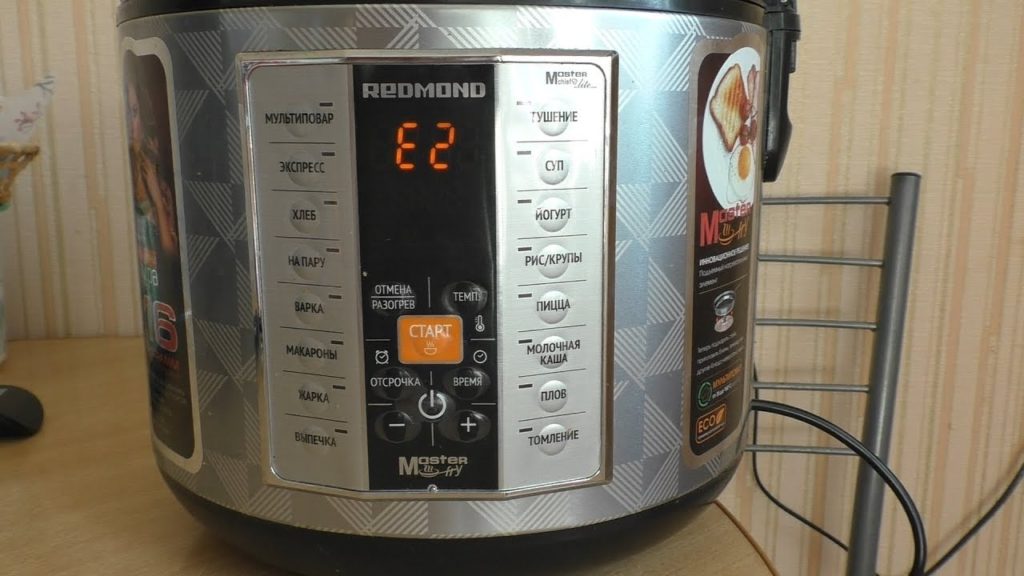
Usually, if the multicooker suddenly breaks down or refuses to turn on, a code appears on the display that signals the cause of the failure. Typically, a cipher begins with the letter E and a number from 0 to 5 after it. The code indicates a possible cause of the malfunction, so further repair actions depend on this index.
The following message options are possible:
- E1. It means the heating element burns out, this happens when moisture, fat, food particles get inside. You will have to disassemble the structure, clean it and dry it.
- E2. On Polaris models, this means a short circuit of the upper temperature sensor, which is mounted under the cover. In addition, this combination can indicate an open circuit, so you need to check the wire that goes from the display to the sensor. To assess its condition, you must use an ohmmeter.
- E3. First of all, it is necessary to check the tightness of the cover. It is also possible that the cause of the malfunction lies in the dirty inner surface of the housing. It is necessary to disassemble the product, clean it and dry it.
- E4. The pressure sensor has broken. Most likely, the problem is that it is clogged, but an open circuit is also possible. In addition, such an error occurs when there is a malfunction in the microprocessor. This is the worst breakdown code since you have to check virtually the entire product.
- E5. The index is displayed when the overheat protection system is activated. Perhaps you just put the device next to the battery or the gas stove turned on. But the problem may also be hidden in clogged steam valves. If the appliance smells of smoke, then you probably burned the wiring.
When you can’t do anything?
In the following cases, repairing a multicooker at home with your own hands is unacceptable. It is necessary to carry it to a specialized workshop:
- no reaction to action;
- no temperature information;
- the display shows a different error code;
- there is visible damage to the cable or housing;
- programming does not work;
- The slow cooker does not heat;
- lack of tightness of the lid.
What problems can be fixed?
If you find messages E1 or E2, you must perform the following steps:
- View the surface under the bowl. If there are drops of moisture or food crumbs, clean and dry the product.
- If everything is clean inside, then you need to turn the crock-pot over and unscrew the fastener that holds the bottom cover. In this way, you can disassemble the structure. Inspect all entrails; if there is dirt or moisture, remove it.
- If everything is clean inside, then you need to find a thermocouple - this is a tubular sensor with a connected wire. For cleaning, you need half-rolled emery paper with small grains (No. 0). To disconnect the contacts, push the upper plate from the side of the adjusting screw so that a click is heard. After that you need to shove the emery and release the plate (let the contacts stand back). Then carefully clean the terminals.
The easiest way is with an E3 error. To fix the problem, turn the Vitek multicooker and unscrew the fastener that holds the bottom cover. Then you need to get all the insides, clean them and dry. You can use a hairdryer for quick drying, but with a low intensity setting. Then assemble the structure.
The hardest thing will be with the error E4. To correct it, you will need to check all temperature and pressure sensors, inspect the surface for dirt and moisture. Neat sanding paper will be required. If you have some experience, you can try to do everything yourself, but it is better to take the device to a service center.
With E5 error, overheating occurred in the Mulinex multicooker. If a problem is detected, you must immediately click on the “stop” button (turn off), and also unplug the power cord from the network. Then you should open the lid and let the multicooker cool down, you need to wait at least 20 minutes. In the end, it will be useful to assess the condition of the internal surfaces for contamination.
What function does the thermal fuse perform?
The thermal fuse in the multicooker performs the function of protecting against overheating. It has the appearance of a small wire, which is very similar to a resistor. Most of them have a conductivity of 10 to 15 A and operate at a temperature of 150-170 oC. If these values are exceeded, the thermal fuse is burned, which initiates a circuit break. As a result, the device stops working, but the owner avoids a fire in the apartment. To establish that a circuit break has occurred, you can use a multimeter.
Search and replacement of thermal fuse
Most multicookers have several thermal fuses that are coated with plastic to protect against moisture. All of them are inside the case, therefore, to search for a burned out element, you will need to disassemble the device. To do this, turn the crock-pot over, find the bottom mount that holds the bottom cover, and unscrew it.
After the device is disassembled, several wires can be seen inside, you need to find the one that goes from the power outlet to the terminal of the heating element. The wire will go through the thermal fuse, which is located in the plastic tube of the thermal insulation.
In most cases, nothing loose thermal fuses simply hang, but sometimes they are fixed with clamps that are attached to the screw. Please note that fuses are very sensitive to heat, therefore soldering is prohibited.
In addition, manufacturers fix them by crimping, so that thermal fuses cannot be removed. Therefore, to determine the state of each element, it is necessary, without removing them, to use a multimeter to determine the resistance level. When the status of each fuse is determined, it is necessary to replace the defective parts.
Replacing a thermal fuse with an example
Consider replacing one thermal fuse in a living example. There is a crock-pot, which does not turn on the display, initially we do not know what the problem is.
Let's analyze the device. To do this, unscrew one screw from the bottom and open the bottom cover. You can see that the design of the multicooker is extremely simple. Its insides can be divided into 3 parts:
- The power plant is a power supply and a relay switching heating element.
- Control board with display (which does not work).
- Heating element.
Consider the power part of the multicooker and its wires:
- The white wire from the network connector goes to the power supply.
- The red wire goes from the network connector through the thermal fuse to the terminal of the heating element.
- The black wire goes from the terminal of the heating element to the power supply.
- The red wire goes from the second terminal of the heating element to the power supply to the switching relay.
- Yellow is a common ground wire that connects the metal structures of the multicooker (external and internal case).
- The white wire goes to the control board from the switching relay.
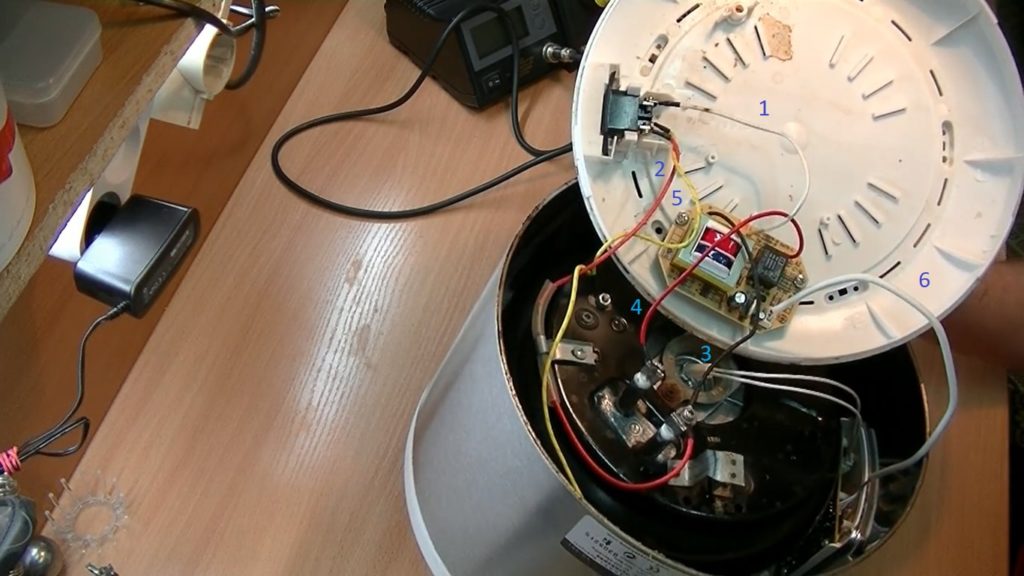
The figure shows the wires by numbers
First you need to find out if the electricity reaches the power supply. To do this, connect the multicooker to the network and first measure the voltage at the terminals of the network connector itself.
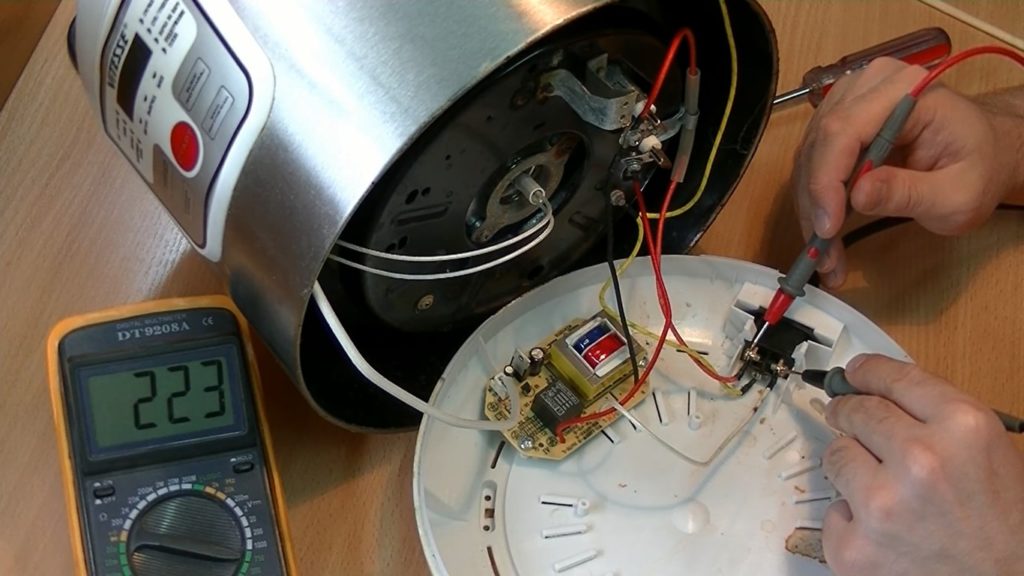
Next, check the voltage between the terminal of the connector and the terminal of the heating element. We see that electricity through the red wire does not reach the heating element.

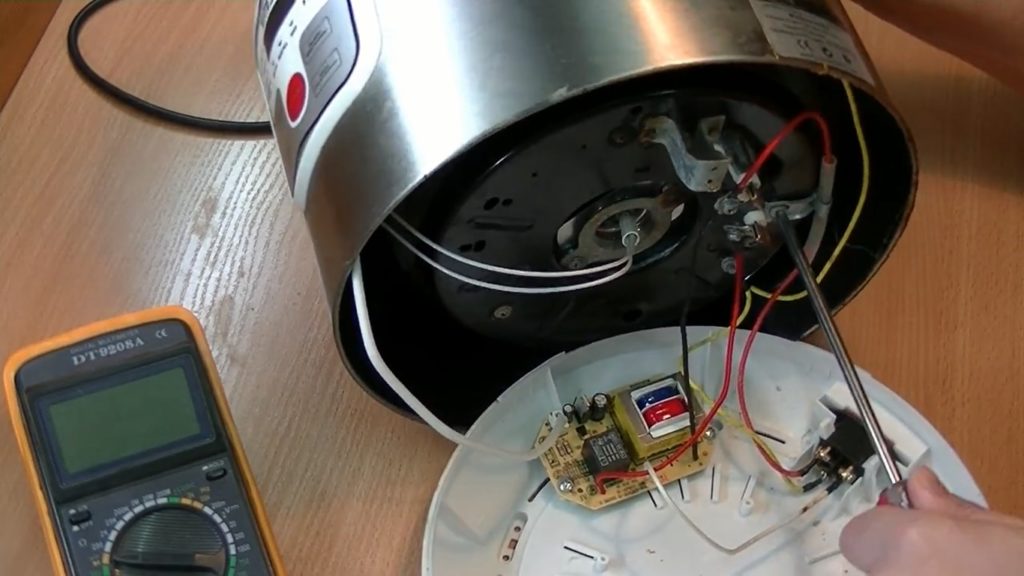
The red wire goes through the thermal fuse, most likely the problem is in it. Take it off. To do this, unscrew the screw from the metal plate, with which the thermal fuse is attached to the multicooker body.
Turn off the screw.
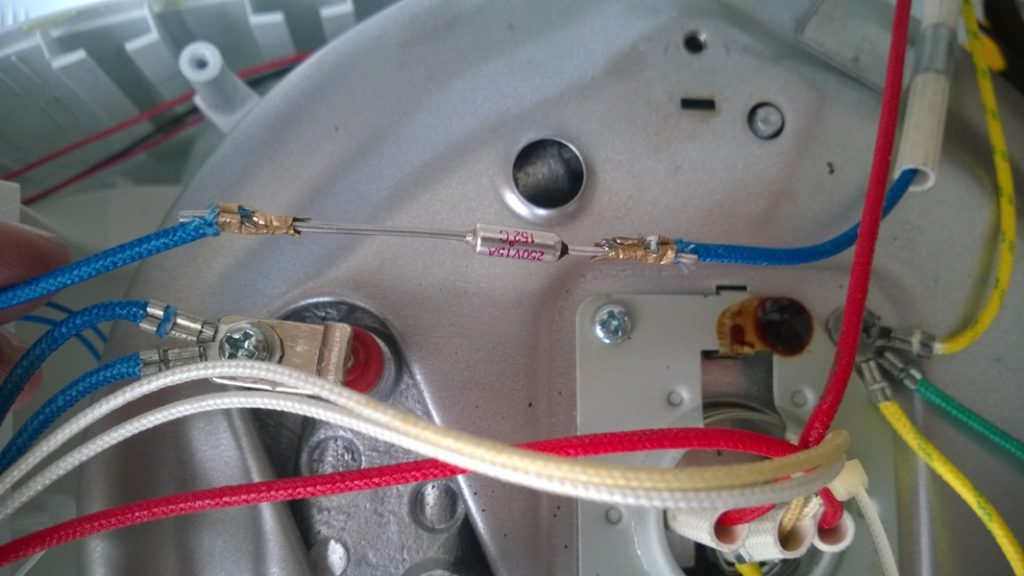
Let's see the model:
- model - RY184;
- temperature - 184aboutFROM;
- current strength - 10 A;
- voltage - 250 volts.
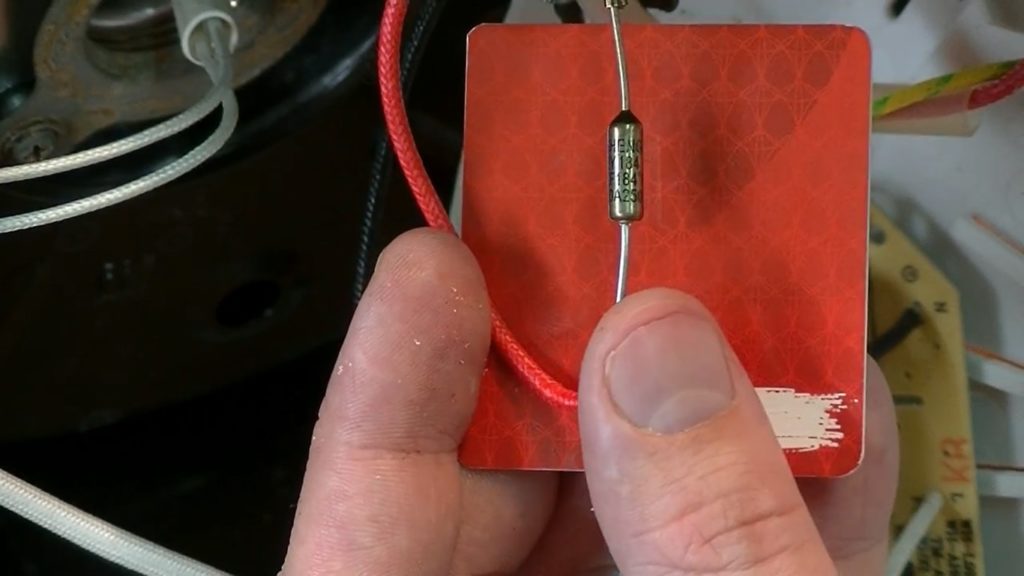
Thermal fuse close-up
We disconnect the thermal fuse with the help of wire cutters. We order a new item with similar characteristics.
The thermal fuse can not be connected to the wires by soldering, so you need to make sleeves for crimping. They can be made from a radiator for a transistor. The resulting two plates must be cleaned with sandpaper. And then bend them into open tubes.

Sleeves which turned out from a radiator
Using the sleeves, we attach the thermal fuse to the wire by pressing with pliers.
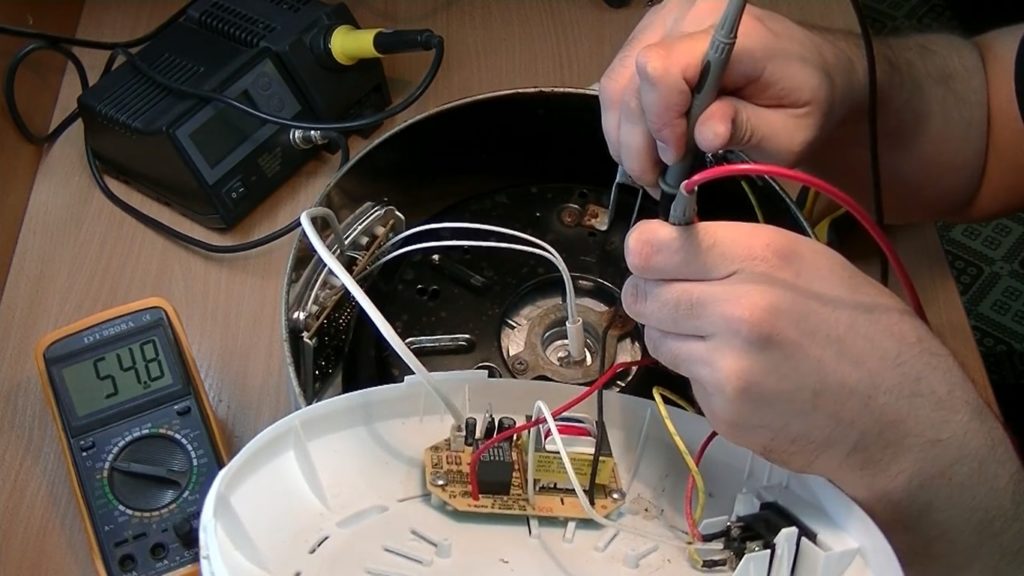
The fuse is fixed to the inner casing with a metal plate into which it is wrapped. It needs to be screwed into place. After that, you can check the voltage at the terminals.
When we are convinced that everything worked out, turn on the multicooker and see the result.
Chips in modern multicookers
In modern multicookers there are 2 microcircuits. The first is located in the very center of the device inside the working cylinder and is responsible for controlling the temperature regime. The second is located at the bottom of the multicooker and is a power electronic board.
If you carefully examine the chip, you can find with the naked eye some types of malfunctions:
- swelling of capacitors;
- damage to solder joints;
- carbon formation;
- detachment of tracks;
- darkening resistors.
The best repair option would be a complete replacement of the electronic board. However, you can fix the solder or track of the microcircuit with sandpaper with grain size No. 0 and tinning of the broken zones. Jumpers are recreated from the legs of the burned resistors. To fix the soldering and tracks, it is advisable to use varnish, as it protects the board from leaks and oxidation.