During the production of induction cookers, the same glass ceramics are used as for conventional ceramic cooking surfaces. The difference is in the induction coil inside. When turned on, it creates an electromagnetic field that generates heat in the dishes placed on top. It appears due to the movement of molecules with high speed at the bottom of a pan or pan. After removing the dishes from the hob, heat production will stop.
In parallel with the advent of induction cookers, discussions began about the dangers of their use for health. It is proved that the use of induction does not affect life activity in any way - such a panel is ten times safer for a person than a household hair dryer, and this type of stove has become a fashionable trend.
This material is intended for those who want to get into the trend and change the aging plate to “induction”. Let's consider how to connect independently induction hob in the kitchen. Even a novice can cope with this task.
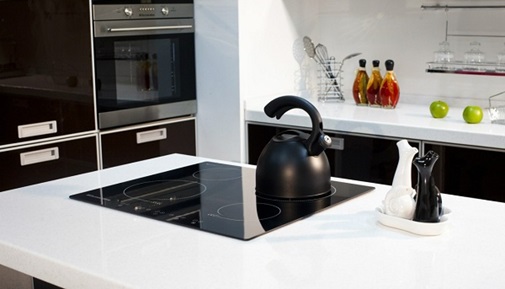
Built-in induction hob
To carry out the installation of the purchased panel, you may need:
- Power VVGNG-Ls or NYM cable;
- A special outlet and a plug for it, designed for a current of 32 to 40 A;
- PVA wire (if it is not provided in the kit);
- Differential circuit breaker;
- NSH tip;
- Terminal block;
- Knife;
- Screwdriver.
How to connect the induction hob
Before starting to install the panel, determine the place for the outlet. It is important that it is below the level of the hob - approximately 0.9 m from the floor - connected to a separate line from the panel at the entrance to the house and have an RCD circuit breaker (residual current device). The body of the device necessarily needs a separate grounding from other devices. If there is a protective earth bus from the manufacturer, connect it to the earth wire of the living room.
It is easiest and most convenient to purchase a specialized outlet and a plug for it, to which the cable wires are connected. It can be three-pin, and then it is important that the ground wiring is connected to the top pin, and four pin.
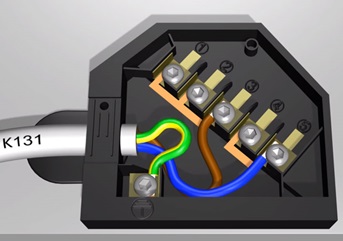
In order to connect the wire to the plug, you need:
- disassemble its case, then remove the insulation from the cable (during assembly of the case, the edge is pressed by the clamp);
- attach to the box by crimping the cores with a tip for tight contact;
- tighten the screws on the plug.
When choosing a cable, take into account two important conditions: it must be copper and only three-core. If you rely on GOSTs, then in residential premises its minimum cross section should be 6 square meters. mm Make the main emphasis on the power of the device that you want to install.
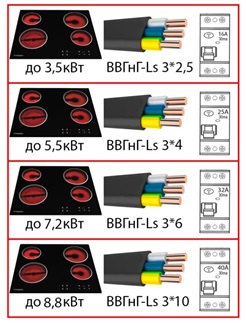
Table for individual cable selection
RCD selection
Protective automatic installation should be selected in accordance with the level of energy consumption by the panel. Power is considered the main characteristic. induction hob. The larger this parameter, the more bandwidth the machine needs to buy. Find out all the data is better in advance. You can do this by opening the instruction manual or by asking the seller consultant. When buying a circuit breaker, you need to consider that it will have to protect all wiring elements from possible emergency situations in it. Typically, these switches solve several problems:
- convenience of manual switching of connected circuits and power supplies;
- completely safe current transmission process in operating mode;
- automatic shutdown in emergency conditions.
Cable connection and operation check
To connect, you need a separate line with a socket that can withstand voltage of 32-40 amperes, and a well-made ground. Before starting work, a network cable is purchased that will correspond to the power consumption of the purchased panel. For this purpose, usually use one whose cross section is 4 or 6 square meters. mm It is clear that the 6-millimeter is chosen for the most powerful options of inductive panels with 4 rings. As for the length, it should calmly reach the outlet.
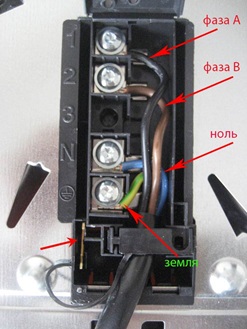
If there is already a wire in the kit with the induction panel, then to figure it out, the easiest way is by color: it is customary to indicate the phase with a brown-black hue, zero with a blue tint, and earth with a yellow-green hue. According to the international standard, hob circuits are usually represented by 4 terminal names:
- L1 and L2 are the first and second phases,
- N– zero, neutral output,
- PE - grounding.
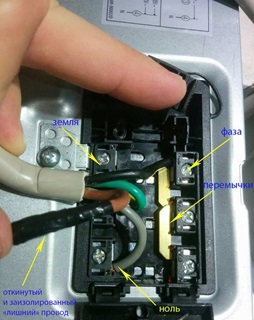
If the user does not independently create an individual cable for the outlet, because the cable is already laid in the wall, the following happens: from the panel itself there is one cable with 4 cores, and 3 power wires from the wall. In such a situation, a connection consisting of 2 phases is necessary, but in the living room it is only one.
You can get out of the situation in the following way: the brown wire coming from the hob is combined with black and the phases are connected to the wire. The blue neutrally charged wire must be connected to the neutral wire, and the ground (yellow-green) to the same one that exits the wall. Each compound is isolated.
Important! Provided that from the wall all the wires are of the same color, a multimeter is needed to determine the phase. Using it, you can check the correctness of the connected wires inside the outlet.
About wiring diagrams
Cooking panels are designed for both single-phase (220 V) and two-phase connections (380 V). We explain that the power is distributed equally, and in the case of a two-phase, half the burners will work from one, half from the second phase. Combination of 2 phases into one output is allowed (as happens in Bosch panels).
Provided that there is a cable in the kit, the manufacturer also applies the terminals for their connection. The latter can be found by turning the panel over. There will also be a scheme that should be guided by.
When connecting the cable to the terminals, you need to look at the diagram on the underside of the panel with the instructions.
Hint: if you have a single-phase network, choose a circuit labeled 1N. If you take into account the instructions on the presented diagram, the 1st, 2nd and 3rd terminals are connected by jumpers that come with the device with the 4th and 5th.
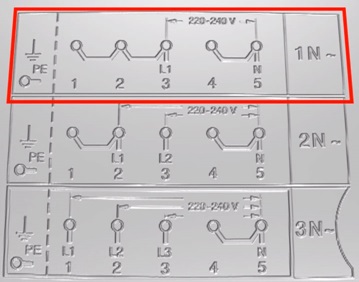
Scheme on the reverse side of the induction panel
We will present several schemes for connecting panels of different brands:
circuit in Bosch
Scheme in Zanussi
Scheme in Electrolux
In the absence of the possibility of acquiring, for one reason or another, a power outlet with the required power, an alternative may be to connect an induction hob to a terminal block that is installed in the mounting box. The block must withstand the current rating of the connected electrical device.
Selecting a location and preparing a hole for installation
Logically and correctly place the induction panel above the oven. Another recommended place to mount the appliance is the space above the dishwasher.
Further work of the hob will be ensured by how smoothly its surface is installed and how tightly fixed. There is good ventilation above it, thanks to which it will not overheat. The hood should be at least 75 cm away from the panel.At the same time, the back wall of the panel should not be in contact with the adjacent vertical edges of objects and there should be a few centimeters of space between them, as below.
Installation of the surface in the countertop, its fixing and sealing
- Inside the box into which the panel will be inserted, markup should be done with a pencil, circling the inner edges of the device on the back of the countertop.
- After the blank is placed on the floor face down and the middle is carefully cut.
- The edges of the holes are covered with silicone varnish or foil, - materials that reduce the possibility of penetration of water under the panel.
- Next, the countertop is installed in the usual place.
- Adhesive tape is glued to the inside of the induction panel - this is another barrier to moisture. In some cases, plasticine comes in the kit instead. It must be glued to the countertop along the cutout and mounted on top of the device.
For all work with cables and the electrical side of the mounting as a whole, the surface should be installed at its permanent location in the future. The panel, to which the cable with the plug is connected, is inserted into the hole with a standard mount and pushed on all sides for a more accurate fit. After that, be sure to connect the device to the network and check the operation, removing possible adhesive traces. In the first few hours, some smell of burnt rubber is possible, which is not a defect in the appliance.
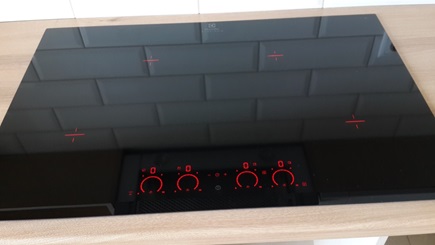
Power and power buttons
When you click on the "Network" button for 1 second, the panel turns on. Then, after a few seconds after connecting to the mains, the user will hear a short beep, - another indicator of normal operation.
Each of the 4 cooking zones available will be switched on from the button, after which you need to adjust the power level from zero to nine. To activate only one zone, you need to press the button corresponding to it and select the power again.
The induction hob can be controlled via an electronic system, while the electric hob is manually adjustable. In other words, the hostess in real time can monitor the regimen of each of the 4 cooking sectors.