- Training
- How to disassemble a laptop
- Disconnect the battery
- Unscrew all visible bolts on the bottom
- Remove all the covers at the bottom and unscrew all the bolts under them.
- Disconnect Wi-Fi module, hard drive, RAM, dvd
- Turn the laptop over and see if the keyboard is removable.
- If the keyboard is removed - remove it
- We unscrew all visible bolts under the keyboard, take out all the cables and connectors
- Gently open the laptop on the side along the perimeter and remove the top cover
- Unscrew the remaining screws and disconnect the connectors, remove the motherboard
- Assemble in the reverse order.
- Service maintenance
- Differences in the disassembly process for different manufacturers
- Subtlety tips for self-disassembling a laptop
- Video
During the operation of the laptop, sooner or later there is a need to carry out service. More often this is due to excessive overheating of the device, due to which slow operation is observed. Overheating also occurs when the operation of the cooling system is disrupted. A large amount of dust accumulates in the fan and impedes its effective functioning.
Disassembling a laptop
After-sales service involves cleaning the cooling system and replacing the thermal paste on the chips. These procedures usually require complete disassembly of the device.
Another reason to disassemble a laptop may be the need to upgrade. Modern technologies are developing at a pace that even the owners of advanced machines cannot always keep up with. In this case, manufacturers offer users to increase the capabilities of the device by adding or replacing components. Some devices provide convenient access to the nodes necessary for this, which allows you not to disassemble the entire device. For other devices, this will be a necessity.
In addition to these reasons, disassembly may be required for repairs. If any component fails, it must be replaced. And without disassembling, there is no way to get to such a component.
Important! Manufacturers assemble devices in their own way. It is difficult to create any kind of universal disassembly scheme. But the main steps are approximately the same for each model.
Training
Before you begin to disassemble the laptop, you need to prepare the necessary tools. For convenience, it is recommended to take:
- set of screwdrivers;
- several cups for screws;
- sheets of paper for notes and diagrams;
- thermal grease for chips;
- fan grease.
This list is typical for a standard laptop service. It can be supplemented with anything else, depending on the purpose of the disassembly.
How to disassemble a laptop
Disassembly can be considered on the example of devices from the manufacturer HP. The devices of this company have a fairly typical design. During disassembly, a specific procedure must be followed. If this order is neglected, the results can be very disastrous. We describe the main stages of disassembling the device.
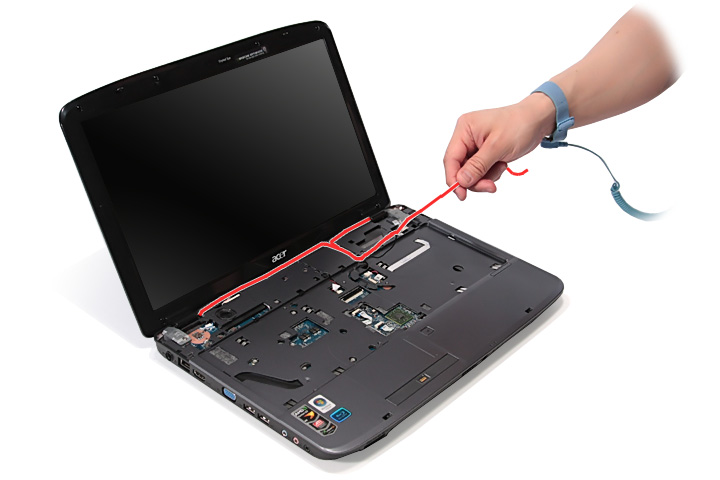
Disconnect the battery
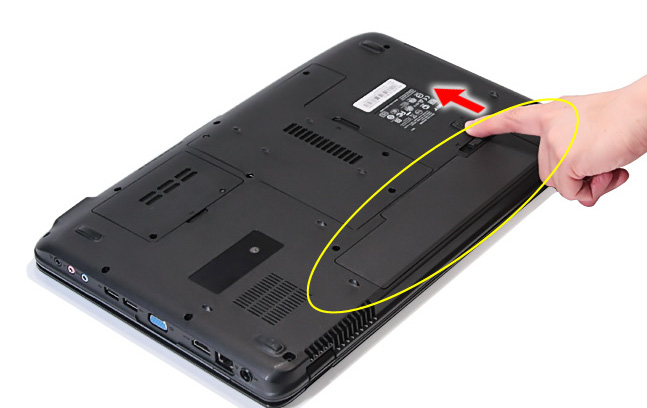
Battery Disconnect
The first step is to always disconnect the battery from the case. Usually, the battery is disconnected quite simply by detaching the latches. However, in some models, the battery has an internal arrangement, which makes it difficult to quickly access it. Dismantling of such devices must be done with the greatest care and attention.
Disconnecting the battery is necessary in order to de-energize the components of the device.Indeed, if you disassemble the device under voltage, there is a high probability of shorting any contacts and thereby cause a short circuit. This will inevitably lead to the failure of some components. And such a "service" turns into a very serious and overhead repair.
Unscrew all visible bolts on the bottom
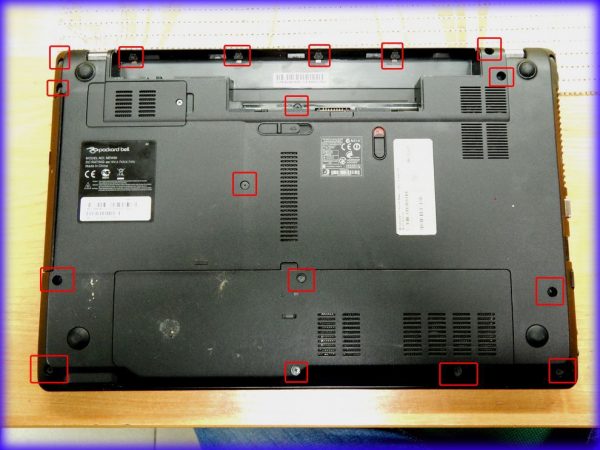
Unscrewing bolts
Direct disassembly should be started by unscrewing the visible bolts on the bottom. They can fasten laptop covers, hold the motherboard or any component. Bolts can be of different lengths, so you need to remember their location. To do this, you can use the sketched diagram.
It is worth noting that different screwdrivers may be required to remove the bolts. Most often, this is a cross and in the form of a "star".
If the bolt does not loosen, you may need to pick up another tool. If you apply too much force when loosening, you can damage the cap of the bolt. The nicks may go astray and further use of the bolt will be difficult.
Remove all the covers at the bottom and unscrew all the bolts under them.
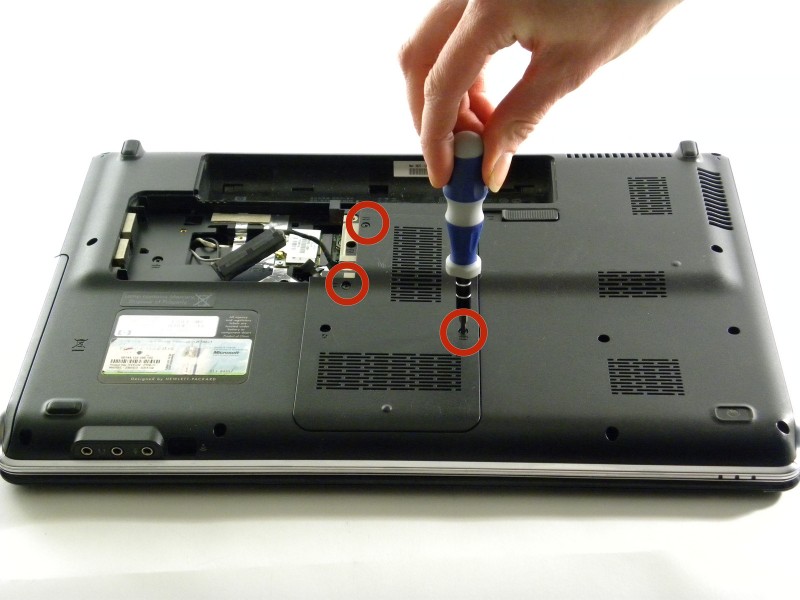
Cover removal
Many devices have special covers at the bottom of the enclosure that allow access to some components of the device. These covers are bolted. They also need to be removed. Under covers there will be components and their fastenings. The bolts under the covers also need to be unscrewed.
Disconnect Wi-Fi module, hard drive, RAM, dvd
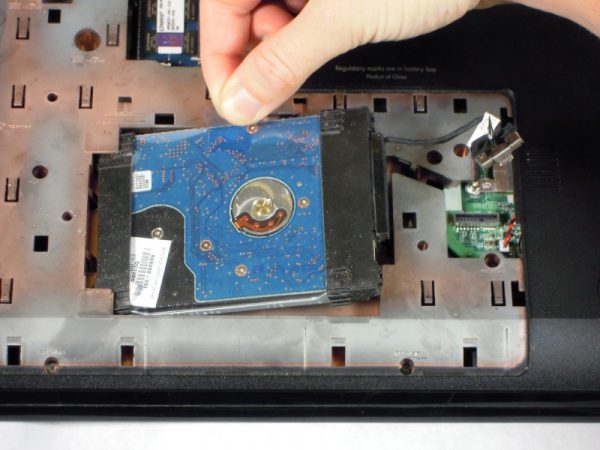
Disabling Components
Next, you need to pull out the components to which you have access. Usually, the Wi-Fi module is removed first. It is mounted on special rails and connected to two antennas. The antennas must be carefully disconnected by pulling on the wiring. Sometimes it may be necessary to pry the plugs with something.
If you have access to the hard drive, you must remove it. The disk is mounted on bolts, after unscrewing of which you need to gently pull the component. If there are no obstacles, the disc should be easily pulled out.
The covers on the bottom usually hide access to RAM for convenient replacement. To disassemble the laptop, it is not necessary to pull out the RAM, but for convenience this can be done. RAM strips are fastened using special latches. Bending these latches, you need to smoothly pull the bar and pull it out.
At this stage of disassembly, you can usually pull out the disk drive. It is mounted on special bolts or on latches. As soon as the fasteners are loosened, the drive extends to the side.
Turn the laptop over and see if the keyboard is removable.
In further disassembly of the device, differences begin depending on the manufacturer. You need to turn the device over and look at the keyboard. It can be removable or non-removable. A removable keyboard is usually pretty easy to spot. It is a certain module, clearly separated from the topmost cover of the laptop.
If the keyboard is removed - remove it
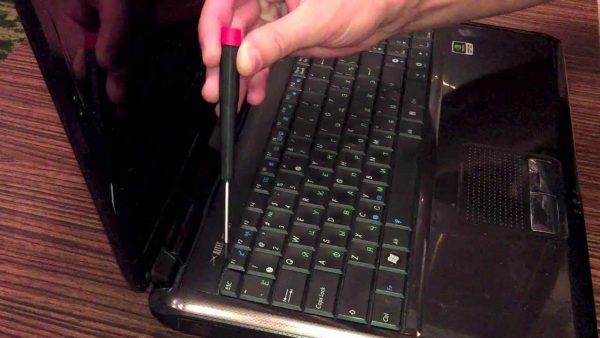
Keyboard removal
If it is found that the keyboard can be removed, it is from this that the further disassembly continues. Most manufacturers fasten such a keyboard on latches. In this case, a pick or a flat object with which you can pry the keyboard can be very useful. With the help of this "spatula" you need to go around the entire perimeter of the keyboard and snap off the mount. This must be done as carefully as possible, since the fasteners are plastic and rather fragile. Excessive effort can easily damage or even break them. The consequence will be a permanent gap between the case and the keyboard. As soon as the fasteners are opened, the keyboard should be removed.
Some keyboards come with extra bezels on top. In this case, before removing the block itself, you need to remove this frame.
Everything is quite simple, but it turns out that many manufacturers additionally stick keyboards. In this case, it takes a little more time and patience to disconnect the component.
The keyboard is attached to the motherboard using a special cable, which must be disconnected. This procedure is carried out with the utmost care so as not to damage the wiring.
We unscrew all visible bolts under the keyboard, take out all the cables and connectors
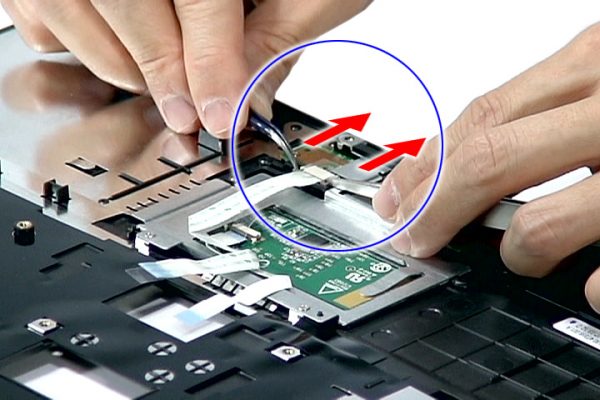
Loopback
Once the keyboard is removed, you need to inspect the surface under it. There should be a large number of bolts holding the parts together. Bolts need to be unscrewed. Just like at the beginning, the location of the bolts must be remembered. Next, loops coming from the components to the motherboard are disconnected. Removing loops can be a rather time-consuming process. All loops disconnect in different ways. Some need to be pulled to the side, others up. Do not forget about the snap fasteners that need to be bent.
Gently open the laptop on the side along the perimeter and remove the top cover
Top cover removal
Next is perhaps the most time-consuming process, which will require a sorting out remarkable patience. It is necessary to disconnect the top cover and open access to the motherboard. To do this, using a pick, you need to walk around the entire perimeter of the device and snap off the mounts. In no case should you be in a hurry. If after the first time the lid is not removed, then you must repeat the procedure again. This continues until the top cover comes off under a small amount of force.
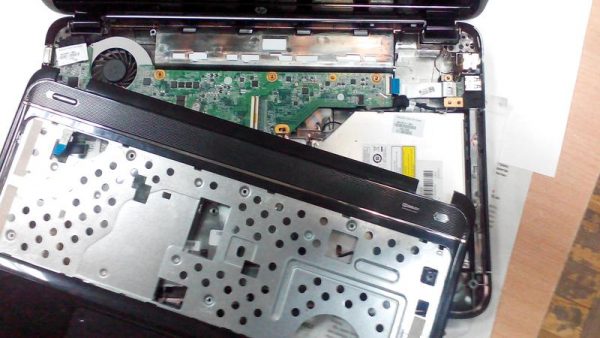
Unscrew the remaining screws and disconnect the connectors, remove the motherboard

Motherboard
After removing the top cover, the exposed surface is inspected. If there are any screws, they must be unscrewed. Similarly, with the back of the laptop. Once the screws are loosened, you can begin to disconnect the connectors. After completing this procedure, the motherboard can be removed and maintained properly.
Assemble in the reverse order.
Once the service is completed, there is a need to assemble the device. The device is assembled in the reverse order in the same way. Screws are screwed into place. Loops, connectors and connectors are connected. The hard drive, drive and RAM are inserted. If no latch was broken during disassembly, the laptop should assemble without any problems. There should be no gaps.
Service maintenance

Service maintenance
Since the most common reason for disassembling a laptop is its after-sales service, you need to understand how it is carried out.
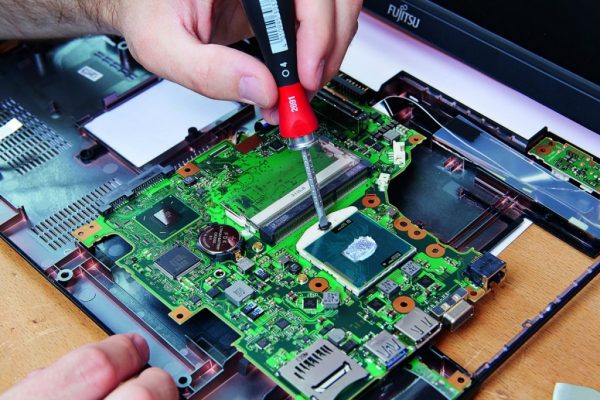
First of all, the disassembled device has a cooling system. It is necessary to unscrew all the screws holding it above the processor and near the cooler. The screws near the processor are usually signed with numbers. Unscrew them in accordance with this number. This is intended to prevent uneven load on the processor, as a result of which its contacts may be damaged.
After the screws are unscrewed, you need to remove the cooling system. Next, the cooler itself is removed. If a lot of dust has accumulated in it, it must be removed. This is done with a special brush. If necessary, the cooler is lubricated.
Next is the replacement of thermal paste on the processor. Old paste must be removed with a cotton swab soaked in alcohol. The new paste is applied in very small amounts and distributed evenly over the surface of the chip. The cooling system is assembled in reverse order and maintenance is completed.
Differences in the disassembly process for different manufacturers
Different manufacturers
Notebooks from HP, Asus, Acer, and Lenovo are pretty much the same. The whole procedure is kept the same for all models. But some differences are still present. They consist, first of all, in the arrangement of screws, type of fasteners and keyboard design. There may also be differences in the location of the components of the device itself, such as a cooling system, processor, video card, etc.
As for the materials from which the devices are made, it is usually plastic. It is light, strong and durable. However, HP prefers to produce models with an aluminum body. It is much stronger than plastic, then heavier than it.
Subtlety tips for self-disassembling a laptop
Disassembly Tips
Self-disassembling a laptop is a rather complicated process, especially if there is no experience in this matter. There are several basic tips, following which even the most inexperienced user will understand how to quickly and correctly disassemble a laptop.
It is very important to remember which bolts were in which places. Otherwise, there is a chance to spoil not only the places themselves under the mounts, but also get a lax device as a result. For a long time such a device will not last for sure.
One of the main tips is that you should not put too much force when disassembling. It’s better to double-check if there is any screw left. Some screws may be hidden behind stickers or behind special stand extensions. No need to rush. Excessive zeal in applying force will lead to very significant damage. Moreover, such breakdowns have not only aesthetic disadvantages, but can even affect the operation of the device.
Even if the purpose of disassembly is not to clean the cooling fan and replace the thermal paste, such procedures will definitely not be superfluous. Thermal grease on the chips must be applied with a very thin layer, which will smooth out possible surface irregularities.
If during the disassembly process there are any problems that cannot be dealt with, it is best to contact a service center. And in the general case, if there is no desire to thoroughly study the device structure, it is more expedient to provide disassembly to qualified specialists.
All major disassembly articles describe the process associated with the main part of the device, in which the motherboard and all components are located. But sometimes it may be necessary to disassemble the upper part. There is a matrix and some other components, depending on the configuration of the device. To disassemble this part is also not difficult. You just need to unscrew all the screws, snap off the fasteners and disconnect the cable. All this may be required if the laptop screen itself is out of order. The screws in this part are usually hidden by special plugs.
Important! Any self-disassembling the device is a risk. In this regard, manufacturers very clearly regulate this issue. If the device undergoes unqualified disassembly during the warranty period, the warranty is immediately lost. This fact must be taken into account, especially for owners of very expensive devices.
Video
There are many videos on the Internet about step-by-step disassembly of popular laptop models. Before proceeding with this procedure, it is best to familiarize yourself with such materials. Now you can find videos on almost any model. In these videos, the disassembly process is shown in as much detail as possible, with necessary and useful comments from those who have already successfully completed this procedure.
Related video: