Conventionally, a refrigerator can be considered as a system of a temperature regulator, relay, compressor. All three components can fail, moreover, the symptoms are sometimes even the same. Sometimes masters, in the event of a breakdown, suspect a compressor or a temperature controller, but the relay breaks. In this article, we will answer the question: how to connect a conventional starting (relay) device of a standard refrigerator.
In order to install a compressor in the refrigerator, of course, you should understand the principles of its operation and the functions it performs. Otherwise, repairs can be too expensive.
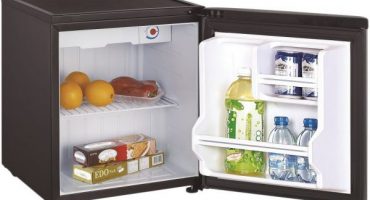
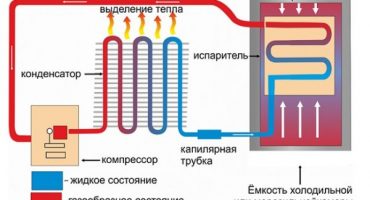
The engine tasks in all refrigeration systems are absolutely identical. The motor must pump out the heated refrigerant (most often, freon), pump it towards the condenser. The task of this component is to cool and, accordingly, liquefy freon.
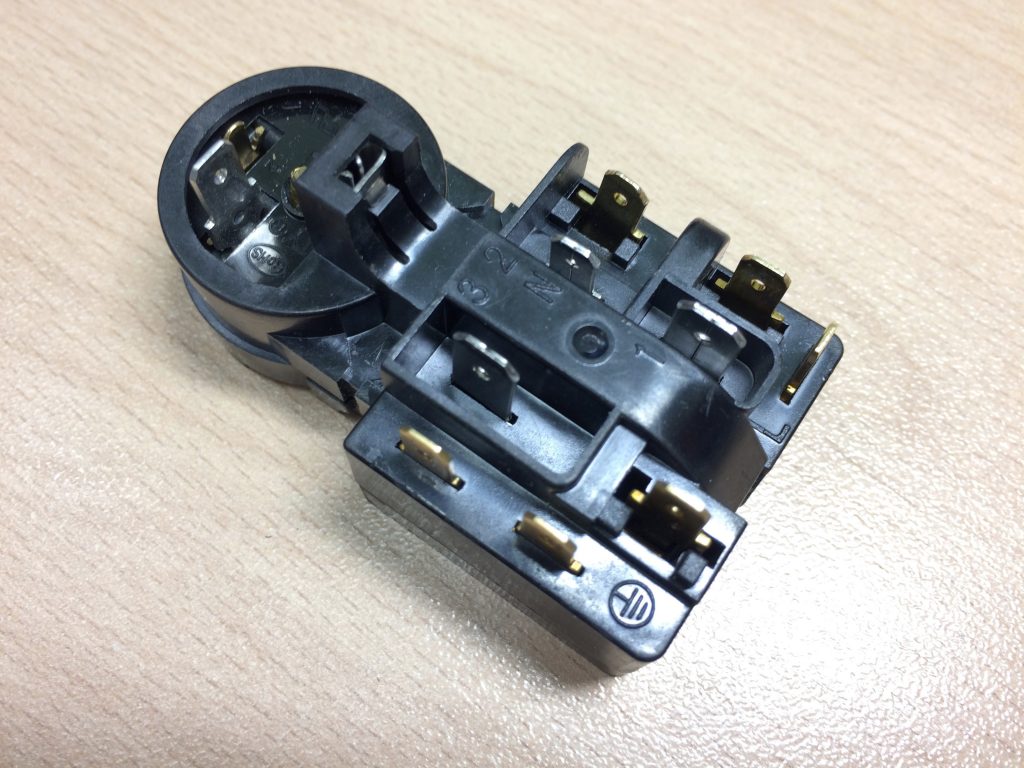
Compressor relay
The principle of operation of the start-up relay
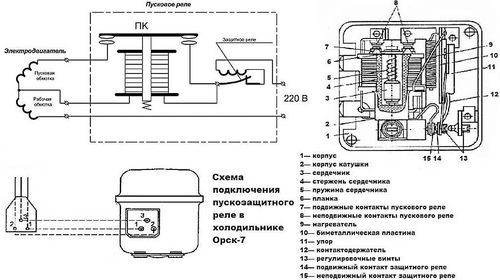
Refrigerator and relay circuit (relay-compressor system)
We will consider the installation compressor example refrigerators Atlant, however, to adapt it and apply it on another type of refrigerator, will not be a problem.
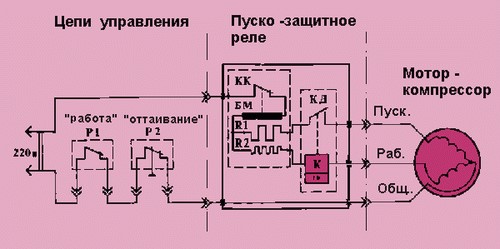
Wiring diagram
The principle of operation is quite simple, it is widely used in many devices containing an electric motor. The engine rotates the crankshaft, which is located inside the housing. With each revolution of the piston the piston is driven; rotational-translational movements are obtained. This causes the gas to pass through the suction valve, and then enter the refrigeration chamber.
The task of the components is to start the engine, thanks to which the compressor works. To connect correctly, you must first understand what the node consists of.
The start-up relay consists of such components as immovable and movable contacts, the core and its rods, heating elements and contacts.
To install the motor correctly, you should carefully study the operation of the starting mechanism.
Relay - the basis through which the motor starts; it is this device that turns it off at the right moments. Thus, it “saves” the engine from overloads, makes it work in a more gentle mode, extending the service life by tens, and sometimes even hundreds of times.
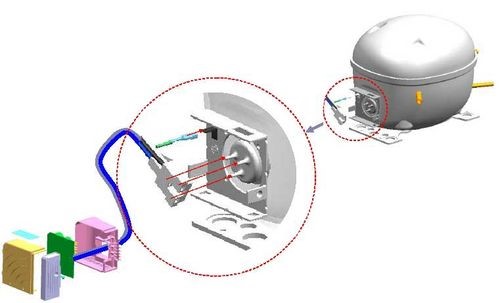
Compressor Connection Algorithm
Before you begin, we recommend that you study the compressor connection diagram in detail.
Trigger relay device
In order to replace (install) the compressor, we need a tester (multimeter), a compressor and, of course, a start relay. It is important to remember that it is possible to start the compressor without a device, but this is done only for the sake of checking the engine for diagnostic purposes. If you want to install a motor in order to get a working full-fledged refrigerator, you should always connect a relay.
The multimeter should be set to kilo-ohms (or Ohms), and then measure the resistance between the windings of the capacitor. The working winding will be the place where the resistance is minimal. This place should be connected to the 220 Volt network through a relay.
We get a relay to which 4 wires are connected: 2 go from the capacitor, 2 directly from the plug. After that, the relay is connected to the motor and the plug is plugged into an outlet.
This allows you to test the compressor: after connecting to the network, air must be sucked into one tube, from the other, on the contrary, blown out.
It often happens that after connecting, the engine does not work. The reason, almost always, is the wedge. To avoid it, to run to the service is not necessary at all, you can wedge yourself.
You will need a special device, which consists of two diodes. The device must be connected to the motor windings and given a short-term voltage for several seconds. After this, after 30 seconds, repeat the procedure. The wedging occurs due to the "swinging" of the motor - with a frequency of 50 Hz, the shaft moves in both directions, such vibrations stop the wedge completely.
Start-up relay design. The difference in location of different types
The start-up relay consists of the following components:
- immovable contacts;
- moving (dynamic) contacts;
- core rods;
- core;
- bimetal plate and its heating element;
- contacts.
To install the motor correctly, you should carefully study the structure and principle of operation. Otherwise, the compressor start-up procedure may not succeed.
A reliable way to diagnose
When the starter stops working, the refrigerator also stops. Symptoms of damage may include the following:
- the engine runs continuously, without interruption (the refrigerator does not turn off itself);
- a large amount of “snow coat” appears on the walls, the device freezes too hard (due to increased and non-stop circulation);
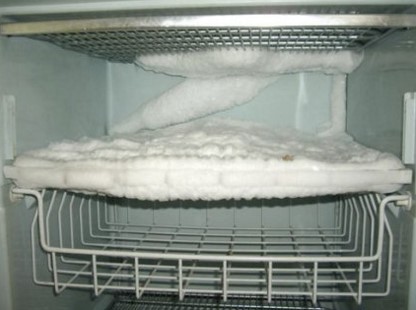
Snow coat - a sure sign of malfunction
- on the contrary, it is too warm inside the refrigerator;
- the refrigerator does not turn on immediately after shutdown (not amenable to "reboot").
You should completely disconnect the refrigerator from the mains, defrost it. All contents should be taken out, the refrigerator should be completely empty. After that, turn on the refrigerator and switch the temperature controller to the maximum (minimum temperature). Inside the camera, a thermometer (preferably electronic) should be left in the camera. If the relay works correctly, then at the right time the thermometer will record the desired temperature level and the refrigerator will turn off. If, after reaching the indicated temperature, the motor continues to work (and, therefore, to cool), then the starter should be replaced.
How to connect and adjust a relay
If the refrigerator has completely stopped turning on, then it will not be possible to carry out a check according to the scheme described above.
To begin with, it is necessary to disassemble. Unplug the refrigerator from the outlet, remove the adjustment knob, fasteners and remove all protective elements.
A yellow wire is used for grounding (most often it also has a green strip).
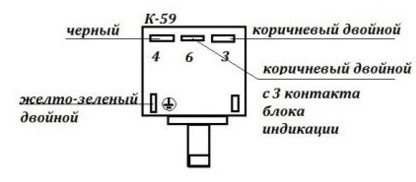
Wiring
Do not touch this cable, but connect all the others to each other (it is best to install a special bus that connects the contacts). If after that the refrigerator does not turn on, this means that the problem is most likely in the compressor.
It is very important to understand and remember exactly which wire was intended for what.
It is very important to check the compressor before replacing it. If the compressor is working properly, then carefully remove the relay and connect a new device to the old wires. Remember that having mixed the wires, you can disable the new relay.
To adjust the component, we advise you to use the above scheme: place the thermometer inside the camera, start the refrigerator to the maximum and wait for it to turn off. Each time, set the relay so that the motor turns off at the same time as the set temperature is reached.