- How to copy and paste text on a MacBook without a keyboard
- How to copy and paste text on a MacBook without a mouse
- Keyboard Copy
- Video instruction
- How to copy images on a MacBook
- How to copy photos from iPhone on MacBook
- How to copy files and folders on macOS
- How to copy files by keyboard shortcut
- Copy files by drag and drop
- Useful keyboard shortcuts
- Finally
The macOS operating system used on Apple computers is stable and has an intuitive interface. Most users adapt to work with it in a matter of days. However, in the first step, even some daily operations can be difficult. Today we will figure out how to copy and paste text information and files on a MacBook.
How to copy and paste text on a MacBook without a keyboard
Most users, especially those with experience using Windows, cannot imagine working with a computer without a mouse. It greatly simplifies the interaction with the graphical interface. Simply select the desired text fragment and call the context menu by pressing the right button. On macOS, when using a mouse, these actions are no different. Only the context menu view can be changed.
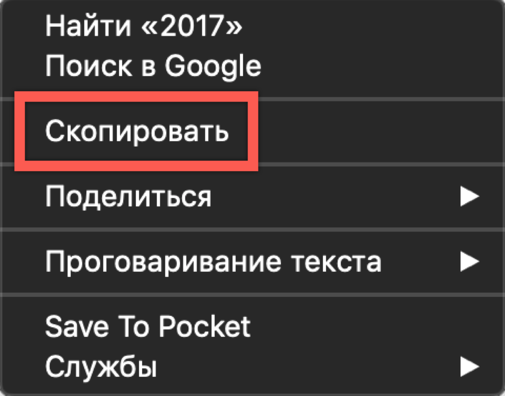
Safari Browser Context Menu
As can be seen in the screenshots, it depends on the functionality of the program with which the user is working. Operations that are supported but currently unavailable appear darkened in the menu.
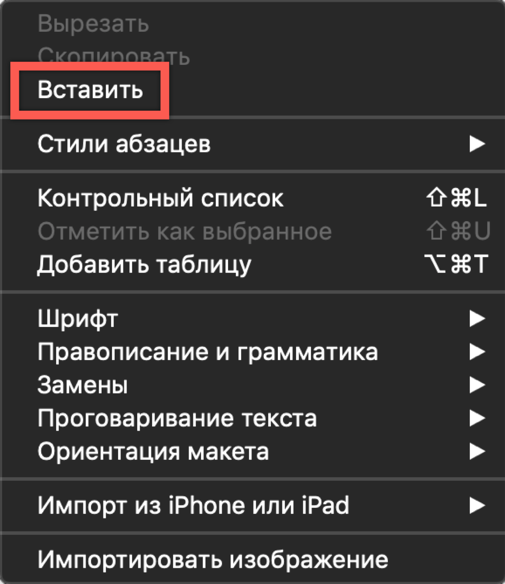
Application context menu
How to copy and paste text on a MacBook without a mouse
All MacBook models are equipped with a trackpad, a touch surface that allows you to work with a laptop without a mouse. In its capabilities, it significantly exceeds the touchpads installed on laptops with Windows, since it is designed for gesture control. The absence of buttons on the trackpad that mimic the operation of the mouse looks unusual. By default, the context menu is invoked by clicking in the lower right corner of the touch panel. In the trackpad settings, this action can be replaced with a double touch in any area.
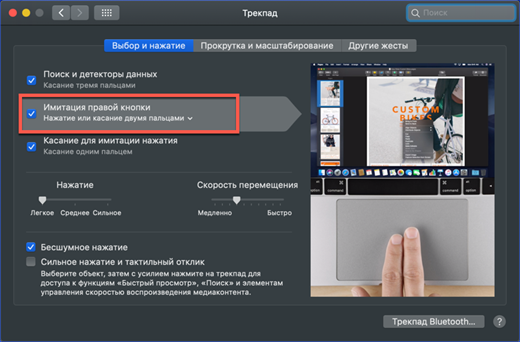
MacBook Trackpad Settings Menu
Having mastered with gesture control and setting up convenient combinations, the user can copy and paste fragments of text without a keyboard and even without a mouse.
Keyboard Copy
Users who often have to work with a large amount of information master keyboard shortcuts for copying. MacOS also has such combinations, although they differ from those used in other operating systems. Here they are tied to the Command modifier key, and look like this:
- Command + C - copy a piece of text to the clipboard.
- Command + V - paste a fragment from the clipboard into the document.

MacBook Key Layout for Copy and Paste
As you can see in the screenshot, the buttons are located slightly closer than in combinations with the Ctrl key on the PC keyboard. Users who previously often had to use keyboard shortcuts in Windows will need some time to get their fingers accustomed to a different arrangement of buttons.
Video instruction
Below you can watch the training video, in which the implementation of the above actions is shown in real time.
How to copy images on a MacBook
In addition to text, it is sometimes necessary to copy an image found on the Internet into a document. To do this, you can use the context menu or simply drag and drop. Let's consider both options in more detail.
Copy the image by dragging and dropping.
MacOS versions starting in El Capitan in 2015 support Split View. Using it, you can arrange the windows of two programs side by side on one screen. After that, it remains only to capture the desired image with the mouse in the browser window and transfer it to a text document. At the time of transfer, the picture will look like a translucent miniature. A green “+” sign on it indicates that the image can be copied and attached to documents. By releasing the held mouse button, we get a copy of it in the text editor window.

Transfer image from browser to text editor
Copy the image using the context menu
The second option allows you to do without using the Split View mode, which is not always convenient on monitors with a small diagonal. In this case, we click on the selected image to call the context menu. We find in it the item noted in the screenshot. We insert it into the document using a key combination or by calling a similar context menu.
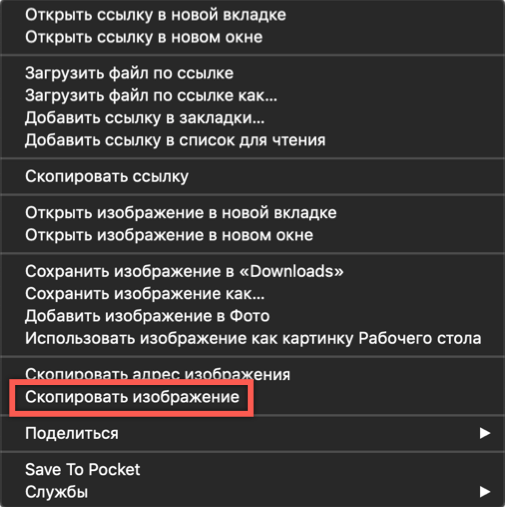
Safari browser context menu when working with images
How to copy photos from iPhone on MacBook
The advantage of the ecosystem created by Apple lies in the interaction between the company's products. If you have a MacBook and iPhone with activated Media Library or Photo Stream, you don’t have to think about transferring photos between them. As soon as the smartphone and laptop are in the range of one Wi-Fi network, the pictures are synchronized automatically. All you need to do is open the Photo app on your Mac and copy the images to the right place. In case there is no wireless network or you need to transfer photos to someone else's Mac, you can use the AirDrop function:
- Turn on Bluetooth on both devices.
- Open the Photos application on the iPhone and select the pictures you want to copy.
- By clicking the “Share” menu, under the thumbnails with the selection indicators, we see a Mac available in the Bluetooth coverage area. Click on the laptop icon and send photos to it.
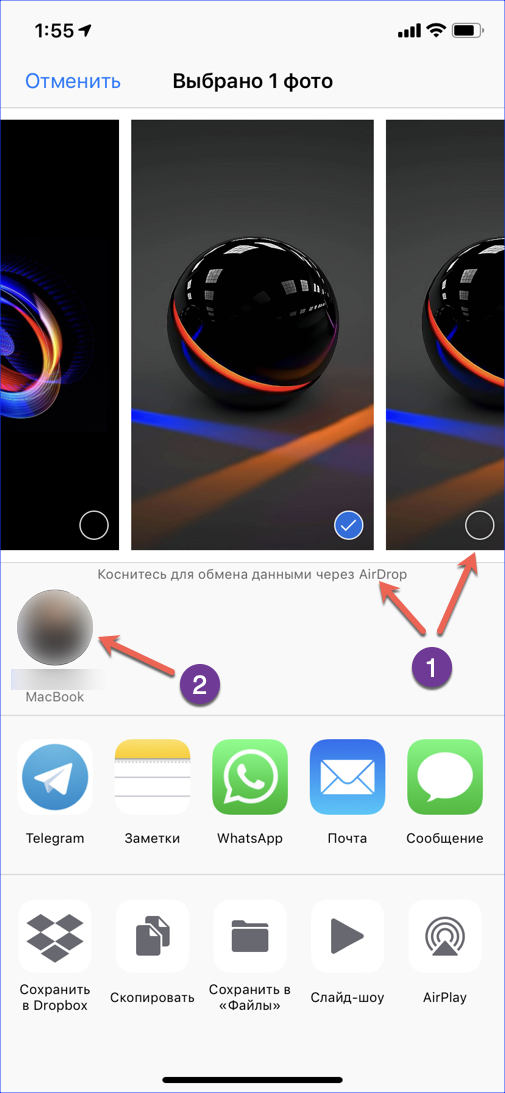
Transfer photos from iPhone to MacBook using AirDrop technology
For older iPhone and MacBook models that do not support direct Bluetooth transmission, you can use a cable connection. In this case, on the smartphone, you must confirm your desire to connect to the computer and trust it, allowing access to the library. After successfully completing the device pairing process, the Photo program will automatically start, offering to import images from the iPhone.
How to copy files and folders on macOS
When working with its own hard drive, macOS always moves files from one folder to another. It is assumed that the user thus sorts the data and does not need to create copies. We see a different picture when connecting a flash drive or other external drive. Defining the connected device as intended for storing data, the system automatically creates a copy of the transferred file. Given this feature of the OS, let's figure out how to create a copy on your MacBook hard drive:
- The macOS file action context menu does not contain the “Copy” item familiar to Windows users. Here we are offered a choice of two options: use the "Duplicate" or "Copy" commands.
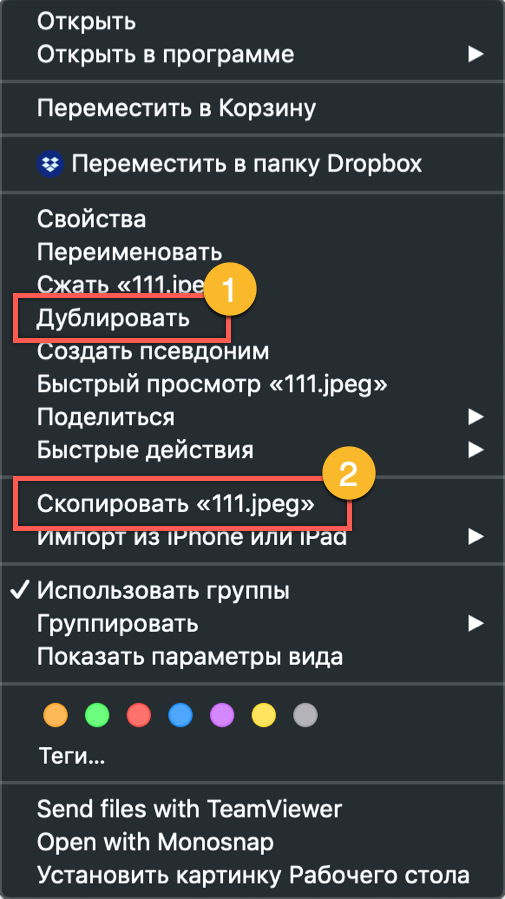
MacOS file action context menu
- Using the first action, you can create a duplicate file, its exact copy. It is placed in the same folder as the original and has the name "File - Copy." The next step is to drag the duplicate to the desired location on the hard drive. Similarly, this method works with folders. Using duplication, you can create copies of folders with all contents.

Result of duplicate files and folders
- The second action, “Copy,” activates the operating system clipboard. After its execution, you need to go to the destination folder and call the context menu again. Select the "Insert Object" option to place a copy of the file in its new location.
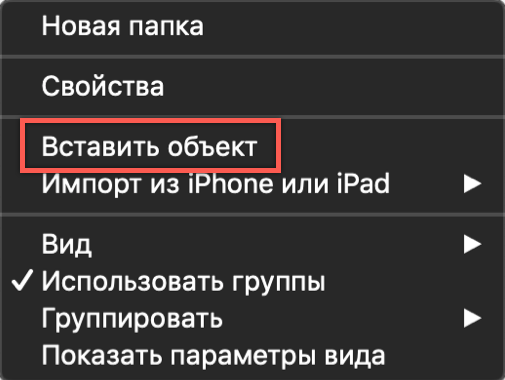
Object Insert Menu in Finder
How to copy files by keyboard shortcut
The described copying method using the context menu is not the only one for macOS. The same operation can be performed using keyboard shortcuts that we learned when working with text. They are standard for all versions of Apple operating systems and require the use of the "Command" button:
- Having marked the file in Finder, hold the modifier key and press "C".
- We go to the destination folder and again holding the modifier, use the "V" button to paste the copied object from the buffer.

Copy and Paste Key Combinations
Copy files by drag and drop
Another option for copying involves using a mouse or trackpad in combination with a hotkey. This time we will use another useful modifier - the Option key. On a Mac keyboard, it’s next to Command:
Option Key Layout
- Clamp the button indicated in the previous screenshot and move the file in the Finder window from its place. Move it to the side so that the “+” sign appears in the green circle on the icon.
- After that, the file can be transferred to the image of the destination folder or simply released. In the first case, it will be copied to the destination folder, and in the second it will be duplicated in the current one. In this case, the number “2” is added to the existing file name.

File copied by drag and drop
Useful keyboard shortcuts
As a UNIX-like system, macOS supports a large number of keyboard shortcuts. As you learn the MacBook, many users get used to using them to speed up ongoing operations. Below we provide a list and description of combinations that may be useful when working with text or files.
- Command + X. Analogue to the Cut function. Works in all text editors used in macOS. A word or text block is cut out of the current fragment and can be transferred to any other place in the document with the original formatting.
- Command + A. Highlight the contents of an open window. It works both in text editors and in Finder. With it, you can select all the objects in an open folder for later copying to a new destination.
- Command + D. Duplicate the file in the current folder without using the context menu.
- Command + Z. Undo the last completed action. Works in text editors and file manager. For example, with its help, you can cancel the creation of a copy in the current folder or return the cut-out fragment of text to its place.
Finally
In this article, we have compiled and described the various copy methods available to macOS users. Using them, you can discover for yourself the unknown capabilities of your MacBook and enter a new, advanced level of interaction with this amazingly convenient operating system.